|
The PvXwiki community finds this to be an excellent build. If you disagree with this rating, please discuss it on the build's talk page. This build has been designed for the following use: |
| |
This build requires Consumables to operate properly. |
| |
This is part of the Dungeon Build series, see Dungeon Guide for all Dungeon builds. |
Kathandrax Manly Spike team is designed to finish Catacombs of Kathandrax fast in hard mode. It uses mark of pain and warrior attacks to spike groups. This team does require an essence to work.
The Team[]
- 2x
 /
/ Perma Tanks
 - 3x / HB Warrior
- 1x / MoP Necro
- 1x / Bonder Monk
- 1x / UA Healer
Perma Tanks[]
<pvxbig> [build prof=A/E sha=12+1+3 ear=12][Shadow Form][Shroud of Distress][Optional][Great Dwarf Weapon]["I Am Unstoppable!"][Armor of Earth][Death's Charge][Recall][/build]
- Perma 1 Optional for [[Glyph of Swiftness] or [[Deadly Paradox]
- Perma 2 Optional for [[Ebon Battle Standard of Honor]
- [[Stoneflesh Aura] over [[Armor of Earth] if u dont feel like using cupcakes
</pvxbig>
Equipment[]
- Spear with 20% enchanting and +5e. +30hp, +10AR vs Fire shield.
- Req 9 earth staff of enchanting
- Longbow for pulling.
- Radiant and Attunement runes.
HB Warrior[]
<pvxbig> [build prof=Warrior/Assassin sword=12+1+1 strength=11+1 Tactics=6+1 shadow=2][Death's Charge]["For Great Justice!"][Hundred Blades]["To The Limit!"][Whirlwind Attack]["By Ural's Hammer!"][Sun And Moon Slash][Ebon Escape][/build] </pvxbig>
Equipment[]
- Zealous and Vampiric Swords
Usage[]
- On spikes use "For Great Justice!" -> Hundred Blades -> Death's Charge -> "To The Limit!" -> Whirlwind Attack.
MoP Necro[]
<pvxbig> [build prof=N/P sou=9+1 cur=12+1+3 Command=9 blood=3+1][Mark of Pain][Barbs]["By Ural's Hammer!"]["Incoming!"]["Fall Back!"][Great Dwarf Weapon]["Finish Him!"][Blood Ritual][/build] </pvxbig>
Equipment[]
- 20/20 Curses set
Usage[]
- On spikes use Mark of Pain -> "By Ural's Hammer"
Bonder Monk[]
<pvxbig> [build prof=Mo/N Smiting=12+1+3 blood=12 Div=3+1][Order of Pain][Dark Fury][Great Dwarf Weapon][Blessed Signet][Life Barrier][Balthazar's Spirit][Life Bond][Pain Inverter][/build] </pvxbig>
UA Healer Monk[]
<pvxbig> [build prof=Mo/E hea=12+1+1 div=12+1][Patient Spirit][Dwayna's Kiss][Seed of Life][Vigorous Spirit][Healing Seed][Heal Party][Unyielding Aura][Glyph of Swiftness][/build] </pvxbig>
Equipment[]
- 40/40 Healing set
- Survivor and vitae runes
Usage[]
- Keep red bars up
- Put Vigorous Spirit or Seed of life on the warrior before he jumps into a spike.
Guide[]
Start from Doomlore or Longeye's Ledge. The DP Assassin runs to the dungeon and takes the quest from Swithin Nye outside the dungeon.

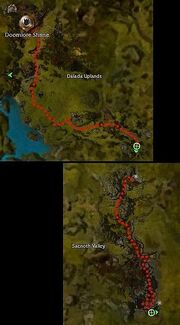
Map to the dungeon
First Level[]


First Floor Route
As you enter, main tank puts recall on the bonder and pulls the first group to the left side of the room. Main team runs pass and secondary tank pulls next 2 groups behind the flame jet. Main tank can cancel recall when everyone has passed by. Main team kills the group secondary tank pulled. Now the main tank runs ahead and pulls all enemies out the way to the main team can run round the room hugging the right wall. As the main team moves round, you should pull foes away from the Infernal Seige Wurm, which should be killed by the warriors and necromancer. Death's Retreat can be used to get back to the team quickly without aggroing any extra groups. As soon as the mainteam has reached the Wurm, the main tank should run to the end of the dungeon, as shown on the map. The secondary tank should wait between the main team and the direction the main tank left to catch aggro as it runs back. Once they have settled, these enemies can be spiked.
Second Level[]


Second Floor Route
The mainteam is not required for this level. Both tanks should run straight to the boss and with EBSOH and GDW, quickly kill it with your staves. Once the boss is dead, either tank can pick up the key and run to the final level. Watch out for the Infernal Wurm popup right after the dungeon lock as he will knock you down as he spawns. Run to final level.
Third Level[]


Third Floor Route
When you load inside, everyone should be immediately go hug the left wall. One of the tanks pull one single Becalmed Djinn with a longbow and get back to the wall. Kill the Djinn. Killing him will cause all monsters within this room to start roaming around. Now the secondary tank can go pull the whole roon away from the exit. The secondary tank should pull the first group from the next room and ocne they have settled they should be killed. After this, the second tank should pull all of the foes from this room away from the dungeon lock. A warrior should hug the right rock and run round until the boss spawns, which should then be killed. Pick up the key and use it to enter the next room. The tank that pulled the first room should have recalled the monk or a warrior at the ast moment, and should rejoin the group to pull the next room. Again, all foes should be pulled away to make it easy for the main team to get through. The secondary tank should have caught up, and should aggro the group inbetween the two wurms. These should quickly be killed and ignoring the wurms, the whole team should run down and wait near the ressurection shrine. Whichever tank is infront should recall up and pull the next room to the far side while the others run past. It is likely the main team will get agro due to the enemy spirits, but a quick dash to the boss and good blocking by the tank should mean there are no problems. This tank should recall out and both tank should cast GDW on the warriors. Be sure to avoid the fire balls that pop and roll around when you agro the boss. With 3x warriors and barbs on the boss, she should drop quickly, and deal little damage due to knocklock from GDW. Seed of Life/Healing Seed should be cast on the necromancer for strong party-wide heals to help keep everybody alive (The necro should go melee range so Healing Seed keeps the warriors alive). If Fire Bombs are dropped, they should be picked up and dropped away from other players. Once the boss is dead, be careful for fire balls as they still move around the chamber while you get the chest.